Description
How to Style a Divi Blurb Module – Free Tutorial & Blurbs
Made in the Style of the Falkor Bundle!
A free Divi Blurb Module with a tutorial on how to style the four up blurbs module. Designed in the style of the new Falkor Bundle, the spring 2018 UI Kit bundle, this blurb module is great for Divi Theme and Divi Builder users. The free tutorial on How to Style Divi Theme Blurb Module has been made to help you work more quickly and save you time and money. In an easy to follow tutorial that you can come back to any time you get stuck you will find useful ‘how to’ instructions.
Introduction
In this tutorial, you will learn how to create a good looking Divi Theme Blurb module. The tutorial will be separated into several sections. The main sections you are going to learn about are:
- Creating section structure and adding Blurb modules
- Customising Section, Row and Blurb module settings
- Adding and customising CTA and Divider modules
VIDEO: Watch the installation video at the bottom of this page
Creating section structure
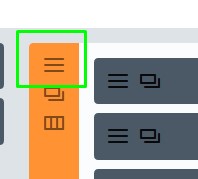
– Create a new Specialty Section
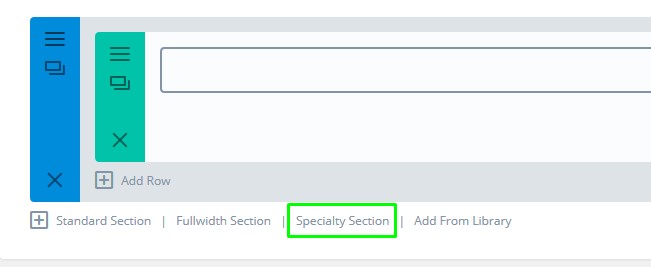
Specialty section
– Choose the structure as shown on the screenshot:
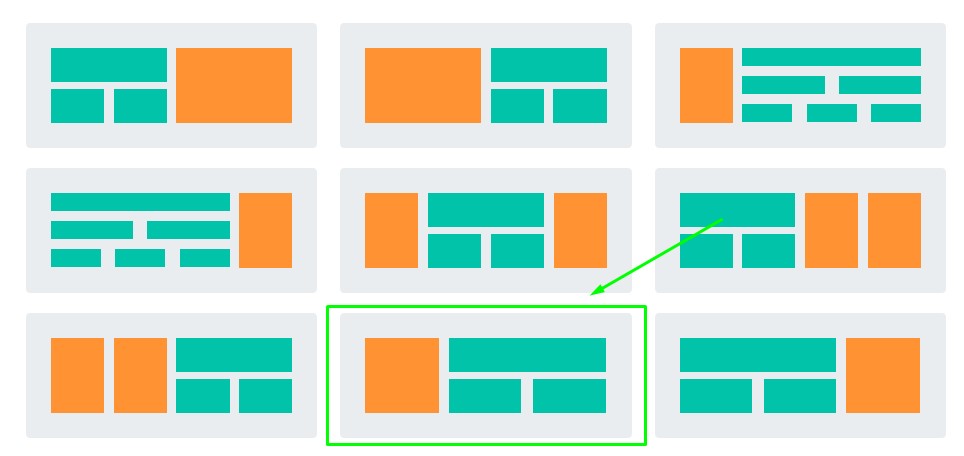
Structure
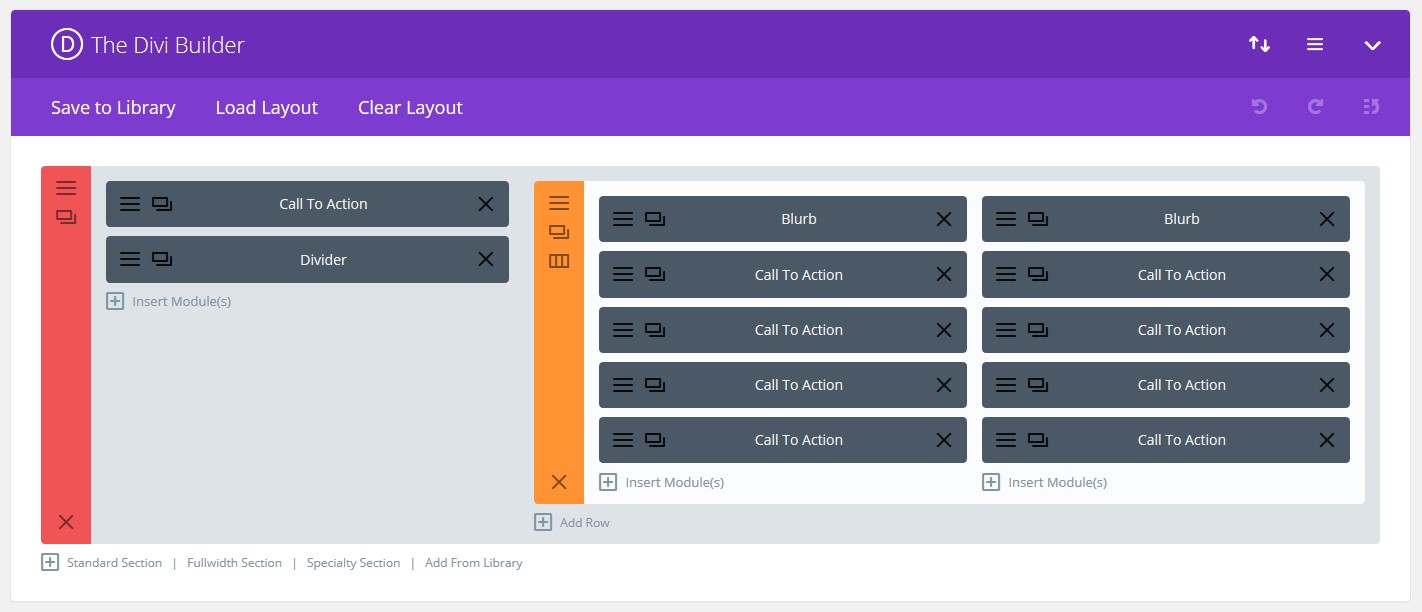
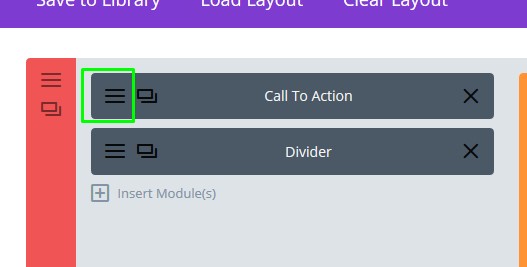
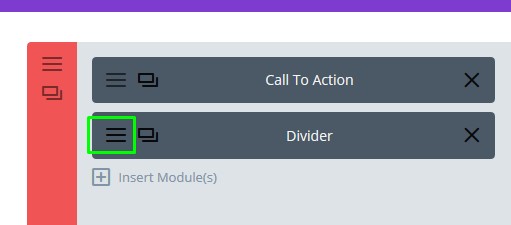
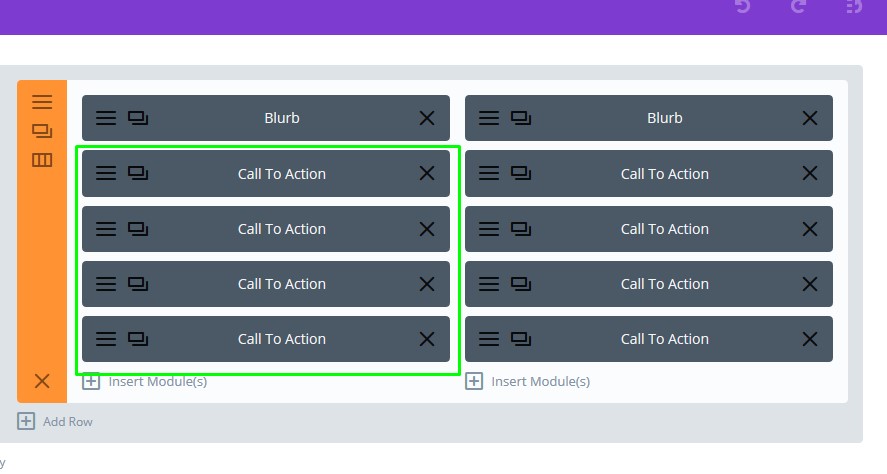
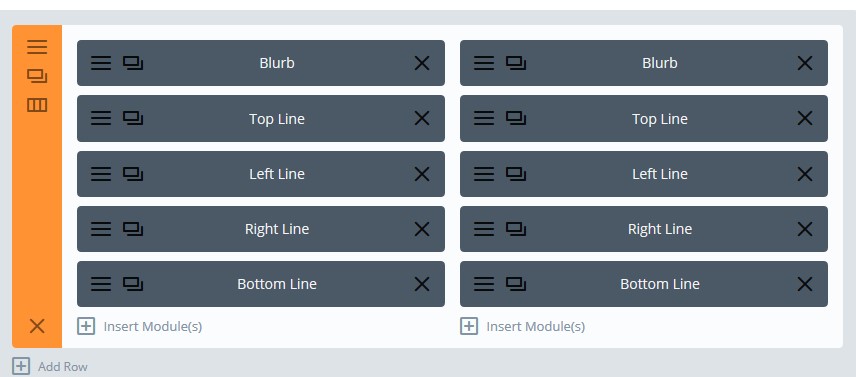
– Left, add two modules: One CTA module and one Divider
– Right, click Insert Column(s) and make it 1/2 + 1/2. Add two Blurbs, side by side.
Under each blurb, add 4 CTA modules.
Your section should now look like this:
Section Settings
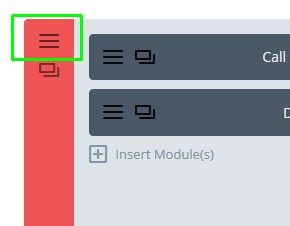
Let’s first edit a few section settings. Click section settings icon:
Content tab
– Make Column1 background: #f7f7f7
– Make Column2 background: #1f2532
Design tab
– Make This Section Fullwidth – Set to Yes
– Equalize Column Heights – Set to Yes
– Use Custom Gutter Width – Set to Yes and make the Gutter Width 1
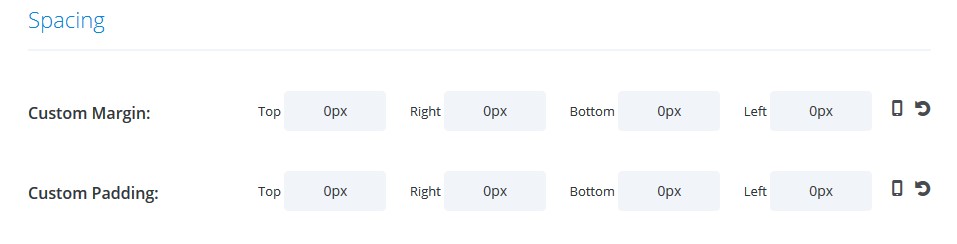
– In Spacing section, make Column1 Pading like this:
Top: 14vw, Right: 14.8vw, Bottom: 14vw, Left: 9.6vw
Also, in Custom Padding, add 0px to Top and Bottom fields.
Advanced tab
– Add CSS Class: blurb_3_f falkor lines
– In Main Element box, paste this CSS:
overflow: hidden !important;
Click Save & Exit
Row Settings
Let’s also edit some row settings. Click row settings icon:
Content tab
– Make the background white
Design tab
– Use Custom Gutter width – Set to Yes and make the Gutter Width 2
– Equalize Column Heights – Set to Yes
– In Spacing section, add Custom Margin so it’s like this:
Top: 6vw, Right: 0px, Bottom: 0px, Left: -105vw
– Add Custom Padding values like this:
Top: 4.2%, Right: 4.2%, Bottom: 0px, Left: 4.3%
Advanced tab
– In Main Element box, add this CSS:
width: 108%;
Click Save & Exit
Add CSS
In your Divi page builder, click page settings:

In Custom CSS box paste this CSS code:
.blurb_6_f .et_pb_column_1_3 .et_pb_image .et_pb_image_wrap,
.blurb_6_f .et_pb_column_1_3 .et_pb_image .et_pb_image_wrap img{
    display: block;
    width: 100%;
}


/*Columns*/

.blurb_3_f .et_pb_row_inner .et_pb_column_1_3:last-child {
    margin-right: 0 !important;
}

.blurb_3_f .et_pb_row_inner .et_pb_column_1_3 {
    width: 49% !important;
    margin-right: 2% !important;
}

.blurb_3_f .et_pb_column_1_3 {
    width: 46.5%;
}

.blurb_3_f .et_pb_column_2_3 {
    width: 66%;
}

.blurb_3_f .et_pb_column .et_pb_main_blurb_image {
    margin-bottom: 24px;

    display: block;
}

.blurb_3_f .et_pb_column .et_pb_main_blurb_image img {
    display: block;
    max-width: 110px;
}

/*Lines*/

.blurb_3_f .top_line,
.blurb_3_f .bottom_line {
    width: 0%;
}

.blurb_3_f .left_line,
.blurb_3_f .right_line {
    height: 0%;
}

.blurb_3_f .top_line {
    top: 0;
}

.blurb_3_f .bottom_line {
    bottom: 0;
    left: 0;
}

.blurb_3_f .left_line {
    left: 0;
    bottom: 0;
}

.blurb_3_f .right_line {
    right: 0;
    bottom: 0;
}


/*Hover*/


.blurb_3_f .et_pb_row_inner .et_pb_column_1_3{
    cursor: pointer;
}
.blurb_3_f .et_pb_row_inner .et_pb_column_1_3 .top_line,
.blurb_3_f .et_pb_row_inner .et_pb_column_1_3 .bottom_line,
.blurb_3_f .et_pb_row_inner .et_pb_column_1_3 .left_line,
.blurb_3_f .et_pb_row_inner .et_pb_column_1_3 .right_line {
    -moz-transition: all 0.3s ease-out;
    -o-transition: all 0.3s ease-out;
    -webkit-transition: all 0.3s ease-out;
    transition: all 0.3s ease-out;
    -ms-transition: all 0.3s ease-out;
}

.blurb_3_f .et_pb_row_inner .et_pb_column_1_3 .top_line,
.blurb_3_f .et_pb_row_inner .et_pb_column_1_3 .right_line,
.blurb_3_f .et_pb_row_inner .et_pb_column_1_3:hover .bottom_line,
.blurb_3_f .et_pb_row_inner .et_pb_column_1_3:hover .left_line{
    transition-delay: 0s;
    -moz-transition-delay: 0s;
    -webkit-transition-delay: 0s;
    -ms-transition-delay: 0s;
}

.blurb_3_f .et_pb_row_inner .et_pb_column_1_3 .left_line,
.blurb_3_f .et_pb_row_inner .et_pb_column_1_3 .bottom_line,
.blurb_3_f .et_pb_row_inner .et_pb_column_1_3:hover .right_line,
.blurb_3_f .et_pb_row_inner .et_pb_column_1_3:hover .top_line{
    transition-delay: 0.3s;
    -moz-transition-delay: 0.3s;
    -webkit-transition-delay: 0.3s;
    -ms-transition-delay: 0.3s;
}

.blurb_3_f .et_pb_row_inner .et_pb_column_1_3:hover .top_line,
.blurb_3_f .et_pb_row_inner .et_pb_column_1_3:hover .bottom_line {
    width: 100%;
}

.blurb_3_f .et_pb_row_inner .et_pb_column_1_3:hover .left_line,
.blurb_3_f .et_pb_row_inner .et_pb_column_1_3:hover .right_line {
    height: 100%;
}

.blurb_3_f.view_port .et_pb_divider {
    -moz-transition: all 0.7s ease-out;
    -o-transition: all 0.7s ease-out;
    -webkit-transition: all 0.7s ease-out;
    transition: all 0.7s ease-out;
    -ms-transition: all 0.7s ease-out;

    transition-delay: 0.6s;
    -moz-transition-delay: 0.6s;
    -webkit-transition-delay: 0.6s;
    -ms-transition-delay: 0.6s;

    max-width: 130px;
}

.blurb_3_f .et_pb_blurb:hover .et_pb_blurb_container {
    -webkit-animation: fadeIn 1s infinite;
    animation: fadeIn 1s infinite;
    animation-iteration-count: 1;
}

@-webkit-keyframes fadeIn {
    from {
        opacity: 0.5;
    }
    to {
        opacity: 1;
    }
}
@keyframes fadeIn {
    from {
        opacity: 0.5;
    }
    to {
        opacity: 1;
    }
}

.fadeIn {
    -webkit-animation-name: fadeIn;
    animation-name: fadeIn;
}
Modules Settings
CTA
Content
– Add Title and Content text
Design
– Text Orientation: Set to Left aligned
– Title text should be: H2, Montserrat, Bold, 48px, #1f2532
– Body text: Lato, Regular, 16px, #757575, body line-height: 1.9em
– In Spacing section, add 0px to Bottom Custom Margin. Also, for Custom Padding left, add 0px
Advanced
– In the Promo Title box, add this CSS:
line-height: 120%!important;
padding-bottom: 30px;
padding-right: 2vw;
Click Save & Exit
Divider
Content
– Show Divider – Set to Yes
Design
– Color: Make it: #0080ff or optionally use your own colour
– Divider positioned – Set to Vertically Centered
– In Sizing section, set Divider Weight to 4px and Height to 4
Advanced
– Addd CSS Class: blue_lines
– In Main Element box, paste this CSS:
max-width: 130px;
text-align: left;
display: block;
margin-left: 0!important;
– Also, disable the module on Phone and Tablet
Click Save & Exit
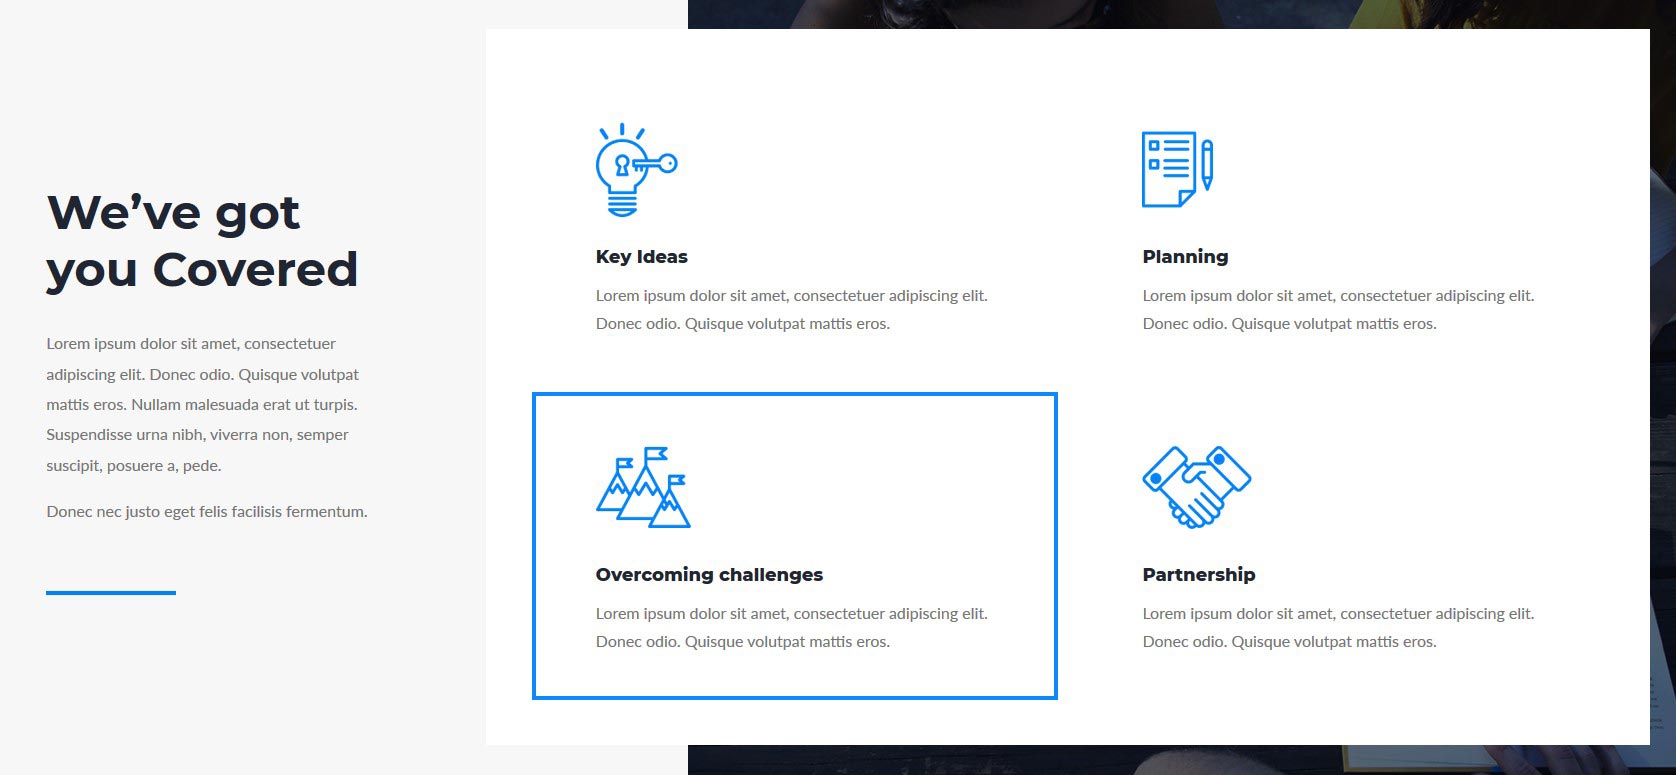
Blurbs

Content
– Give your Blurbs a Title and add a Content
– Also, add icon images.
In this example, we will be using these images: Image1, Image2, Image3 and Image4. However, you can optionally add your own images if you prefer.
Design
– Title text should be: Montserrat, Ultra Bold, 18px, black
– Body Text: Lato, Regular, 16px, #757575
– Add Custom Padding: Top: 20px, Left: 20px, Right: 20px, Bottom: 20px
Advanced
– In Blurb Image box, add this CSS:
text-align: left;
– In Blurb Title box, add:
padding-bottom: 11px;
Click Save & Exit.
CTA’s
Finally, let’s edit CTA modules under the blurbs. We want to achieve that each CTA represents a border line that surrounds the blurb.
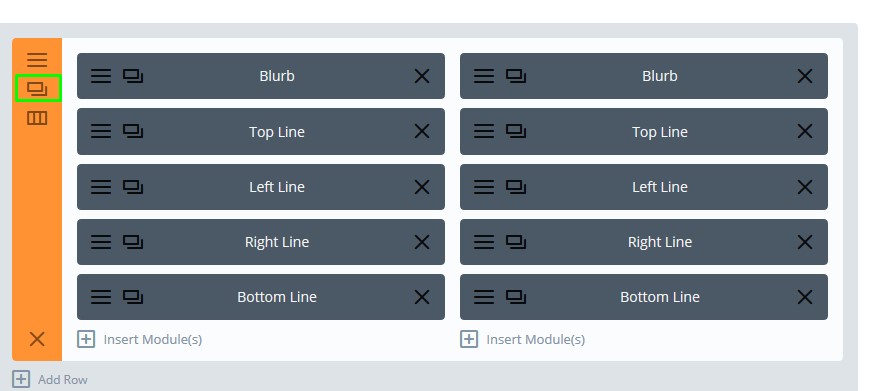
Let’s first set the settings for CTA modules from the left column:
You can than duplicate the same for the right column, once done.
For the first CTA:
Content
– Use this background colour: #0f87ff. In Admin label, you can add “Top Line”.
Design
– For all custom margins and custom padding add a value of zero.
Advanced
Assign a CSS class: top_line line
In Main Element box, add this CSS:
height: 4px;
position: absolute;
Save & Exit
For the second CTA, use the same settings. You can duplicate first one if you like. Only, change the class name to: left_line line.
Also, in Advanced tab, in Main Element box, change “height” to “width”.
Optionally, change the label name to “Left Line”.
Same is for the third CTA, just change the class name to: right_line line and “height” to “width’ in Main Element (Advanced Tab).
For the last one, change the class name to: bottom_line line
– In Promo Description:
padding: 0;
Each CTA representing a line, it should now look like this:
Duplicate row
Now, duplicate everything:
Click the duplicated row settings and go to Design tab. In Spacing section, change Custom Margin TOP to 0px, and Custom Padding TOP to 40px. Also, add Custom Padding Bottom to 40px.
Also, make sure to change the content and images for blurbs in duplicated row.
NB: You will need the Divi Theme for this layout. Get it here.
Licensing terms;
Please read and take note of our Terms & Conditions
Regular License
Divi Den On Demand Plugin
Get access to all Free Divi Den layouts with the WordPress plugin. Simple. Easy. Free.
To review our full Terms & Conditions please click here.
Helpful Tips:
You need the Divi Theme for this product. Get it here
Images are for demo purposes only. Get your own copyright free images
Non-commercial use:
Use any free library item privately to
- Create or maintain personal websites
- Create or maintain your company websites
Commercial use:
You can charge a fee for websites you create, provided that you add value. Ideal for freelancers, marketers and agencies.
- Download unlimited library items
- Add value by changing text, images and/or colours
- Build or maintain unlimited websites
- Don't sell layouts "as is" in a store, or give it away free
What People Say
This plugin has really made me look like I know what I’m doing!
- Flynn
I have been with Divi Den from the get go. I am very hard to please, but they keep pleasing. I have yet to find anything nearly as good. I use DiviDen on everything. Keep going…
- Stephen Wilson wilsonswebs.co.uk
I’d recommend Divi Den Pro to any serious Divi user. I’ve used it extensively and confirm the layouts work well with Divi. The support team is responsive and overall, I’m happy with my decision to use Divi Den Pro.
- Keith Agnew mokalabs.com
It’s me, again praising all of you as usual. How you all manage to keep coming up with ideas that are even more awesome than the previous ones is just amazing. I’m sure I’ve mentioned this before but the only thing better than your designs is your support. It is among the best support I’ve ever experienced on consistent basis if not the best.
- Amit K
Best layout packs out there! So easy to use, so versatile! Amazing support!
- David O (FB permalink)
They create awesome layouts for non-CSS people and their support team is top-notch. VERY responsive and they have saved me on tough items I could not figure out. If you want to work with a winning team on anything DIVI, check Divi Den out. You will not be disappointed. Thank you so much, Divi Den for all your help and to Marko in support too!
- Sonia W
LOVE LOVE LOVE your solutions and generosity with the fantastic layout packs. Your team is solid with it's solutions and creativity. Thanks!
- Cr8tivmedia